
In this blog, I was going to talk about the six “Generations” of the P200 Family, but as I was writing it, I found I was having to do too much duplication due to descriptions of the 6 components of the pencils. So I decided that I needed to write about the components themselves.
In all cases, these descriptions and examples are what I have seen in my collection. I’m sure there may be others that I have not found.
Body
Body Top, showing cutout
Body Bottom, showing printed and molded sizes
Differences between Gen 1-4 & Gen 5-6 body thickness

Inner Body Retainer Slot Differences (looking from eraser end into the barrel)

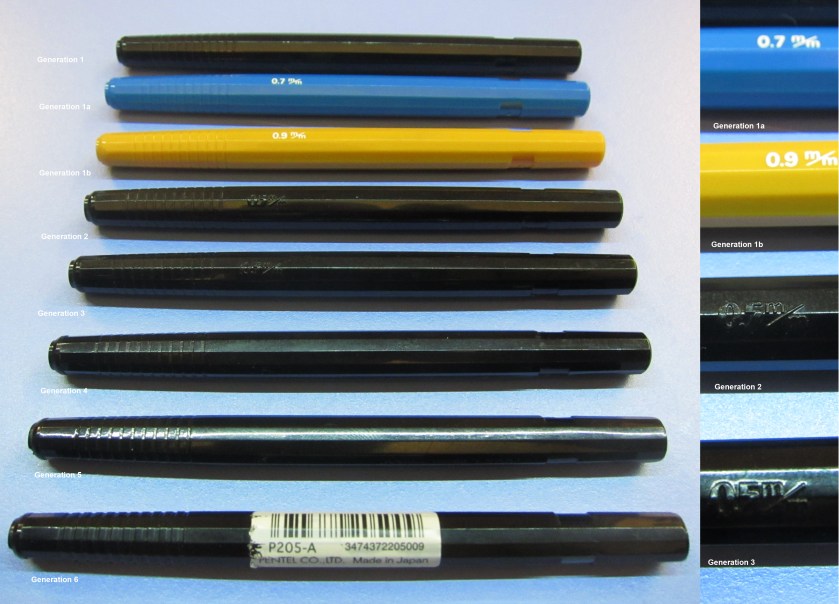
The first component that’s generally noticed is the Body (or Outer Body). This is the primary component for determining generations. There are 6 different iterations of the Body, with a couple of minor variations.
First off, let’s look at what’s common on all versions of the Body. All of these Bodies consist of 12 sides with 2 of the sides combined down the middle length of the pencil (this is where the normal text appears on most of the pencils). Also, at the writing end, there are a series of 11 rings around the pencil to provide some grip, and a ridge right at the connection to the tip. They all have a slot cut out for the clip to fit into and stay in relatively the same place, although there is some play to this. There is also a “Cutout” that changes from pencil to pencil and through generations. All of these pencils have 2 lines of text on them, with the first line always (at least as far as I have found) being “Pentel”. The specifics of the text of the second line help define the iterations of the pencil.
Now to take a look at the changes that define the iterations of the Body.
Body 1
In the original Body, aside from the Cutout, there is no text on the body to identify the pencil. The second line of the Cutout says “P205 JAPAN #”, with the # being the Mark. I suspect the Mark is the mold number, but I don’t know for sure. Looking inside the barrel from the eraser end to the tip end, you can see a “Retainer” slot with 6 corners that the Inner Body fits into to keep it from turning.
Body 1a
This body is just a minor variation of Body 1. The only difference here is that on the bottom of the pencil, opposite the Cutout, is printed text defining the size of the lead, for example “0.7 m/m”. The Cutout still reads P205, even though in this example, it is a 0.7 m/m. This probably occurred in trying to get the other sizes to market before they redesigned the Cutout plate.
Body 1b
This iteration, is the same as 1a, with the size printed on the bottom, but by this point, they have redesigned the cutout to remove the “P205” from the mold.
Body 2
The change defining this body is that they removed the printed text from the bottom of the pencil, and it is now incorporated into the mold, so the “0.5m/m” is now raised print on the bottom of the pencil.
Body 3
This is where Pentel started to print on the side of the pencil in the area with the 2 combined sides. The size is listed as “0.5m/m” with the text on the side varying by pencil series.
Body 4
The change here is that Pentel removed the molded size from the bottom of the pencil. The text on the side generally remained the same, still using the “m/m” to denote millimeters.
Body 5
This was the first major revision of the body. At the very least they have a new inner mold for the pencil, since the wall of the body is now thinner and the “Retainer” slot now has 12 corners, making it quicker to seat the Inner Body. The text on the side of the pencil has now dropped the “/” in the millimeter and now reads “0.5 mm” along with the other identifiers.
Body 6
To the best of my knowledge, this is the current body of the pencils. The only difference I have found is the inclusion of a letter before the numbers in the Mark in the Cutout. Of my pencils, 95% of them start with a B, with the other letters being K or P. All of the Limited Edition colors released after 2010 are of this body type.
Tip

The tip of the P200 family has 2 basic types: the fixed tip, and the sliding sleeve. I will address these tips by size, as there are different variants for most of them.
0.3 mm
This size only has 2 variants that I have identified.
- 0.3 Fixed 4mm – this is the standard fixed tip with the 4mm guide.
- 0.3 Sliding Sleeve – this is the sliding sleeve with the guide that slides between 3mm & 5mm.
0.5mm
The 0.5mm has the most variations of the tip for the P200 family.
- 0.5 Fixed 2mm – this was the original fixed tip that only had a 2mm guide.
- 0.5 Fixed 4mm – this is the standard fixed tip with the 4mm guide.
- 0.5 Gold 4mm – this is the standard 4mm fixed tip with gold colored plating.
- 0.5 Sliding Sleeve – this is the sliding sleeve with the guide that slides between 3mm & 5mm.
0.7mm
The 0.7mm has almost as many variants as the 0.5mm.
- 0.7 Fixed 2mm – this was the original fixed tip that had a 2mm guide.
- 0.7 Fixed 4mm – this is the standard fixed tip with the 4mm guide.
- 0.7 Sliding Sleeve – this is the sliding sleeve with the guide that slides between 3mm & 5mm.
0.9mm
There is only one tip two tips that I have identified for the 0.9mm.
- 0.9 Fixed 4mm –
this is the only size for the 0.9mm. It has the standard 4mm guide. - 0.9 Fixed 2mm – As of April 10, 2017, I have in my hand a pencil with this tip.
Clip
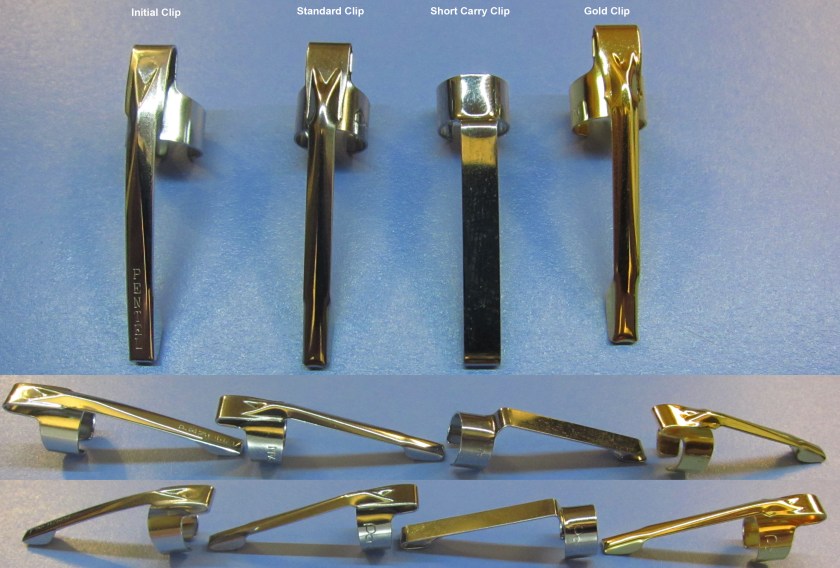
The clip on the P200 family comes off the pencil and rests in a channel that is molded into the body. Holding the pencil with the tip down, the clip should rest just to the left of the print area, lining up with the cutout.
There have been a few variations of the clip. I will describe the ones I know of below.
Standard Clip
This is the clip that’s on all of the P203/P205/P207/P209 bodies that are sold in retail and on 90% of the pencils I have. This type of clip is sometimes referred to as a Deep Carry clip, since the clip comes out of the top of the band and thus sits deeper in a pocket.
Looking at the clip (with the tip down) straight on, the top of the clip portion looks like an arrow pointed down. On the band that holds the clip to the pencil, it says JAPAN on the left side and Pentel on the right.
A variant of this clip with a gold color was used on the Limited Edition Gilded Series P205’s that were released in 2016.
Initial Clip
The standard clip is not the clip that was initially used on the first generation of P205 released. The shape of the clip is the same, just the text is laid out differently.
Initially, the band did not have any printing on it at all, and the word Pentel ran down the front of the clip.
Short Carry Clip
This clip is a different layout from all of the above clips. The text on the band is the same as the standard clip (JAPAN / Pentel), but the clip comes out the bottom of the band, which makes the pencil sit with a shorter distance from the tip to where it would rest in a pocket (thus the Short Carry vs Deep Carry). As far as I know this clip was only used on some of the P215/P217/P219 bodies.
Cap

The cap of the pencil has not changed since 1970, when it was first introduced, other than the gold color on the Gilded Series P205’s. It is a single piece of metal that is press molded to form the cavity, and has an indention on one side that helps it grip and stay on the Inner Body.
The differences come in what I call the Cap Stop and how it relates to the Inner Body. The Cap Stop is what keeps the cap from pushing down on the eraser and down into the Inner Body where you can’t get it out.
When the P200 family was first released, the Cap Stop was in the top of the cap. When initially released, the Cap Stop in the cap was a plastic band that fit inside the cap and when pushed to advance the lead, would rest on the top of the Inner Body, keeping the eraser from being pushed down into the Inner Body.
After the initial release, a change was made to use a metal band in the cap for the same purpose. This metal band is the same band that goes around the eraser.
Later versions of the pencil did away with the Cap Stop in the cap, and now molded it into the Inner Body. These caps do not have anything inside them, but are otherwise the same design.
Eraser
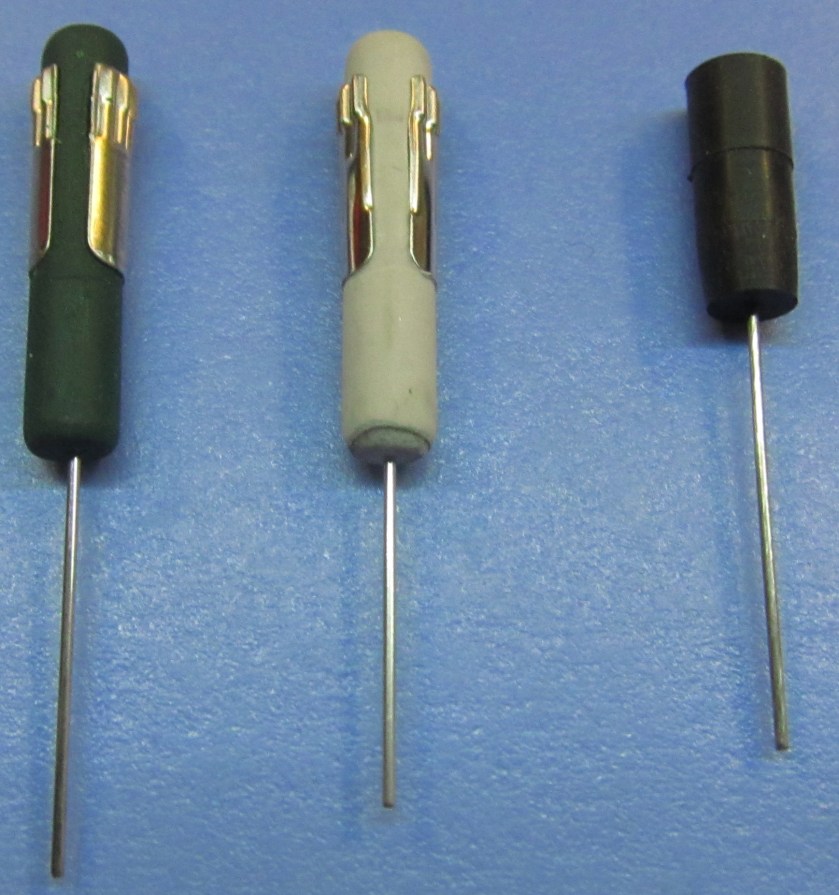
For around 30 years, the eraser in the P200 family was green. In the early 2000’s for the latest design change, Pentel made the decision to change to a white eraser.
The only variation from this, is not actually an eraser. The PF335/PF337/PF339 pencils were designed with a special lead to write on film, and this would not work with an eraser, so these just have a rubber stopper.
One additional thing about the 0.3mm and 0.5mm pencils, is that some of them came with a cleanout pin that was stuck into the bottom of the eraser. With one exception (a PF337 with rubber stopper), I don’t have any 0.7mm or 0.9mm pencils with this pin.
Inner Body

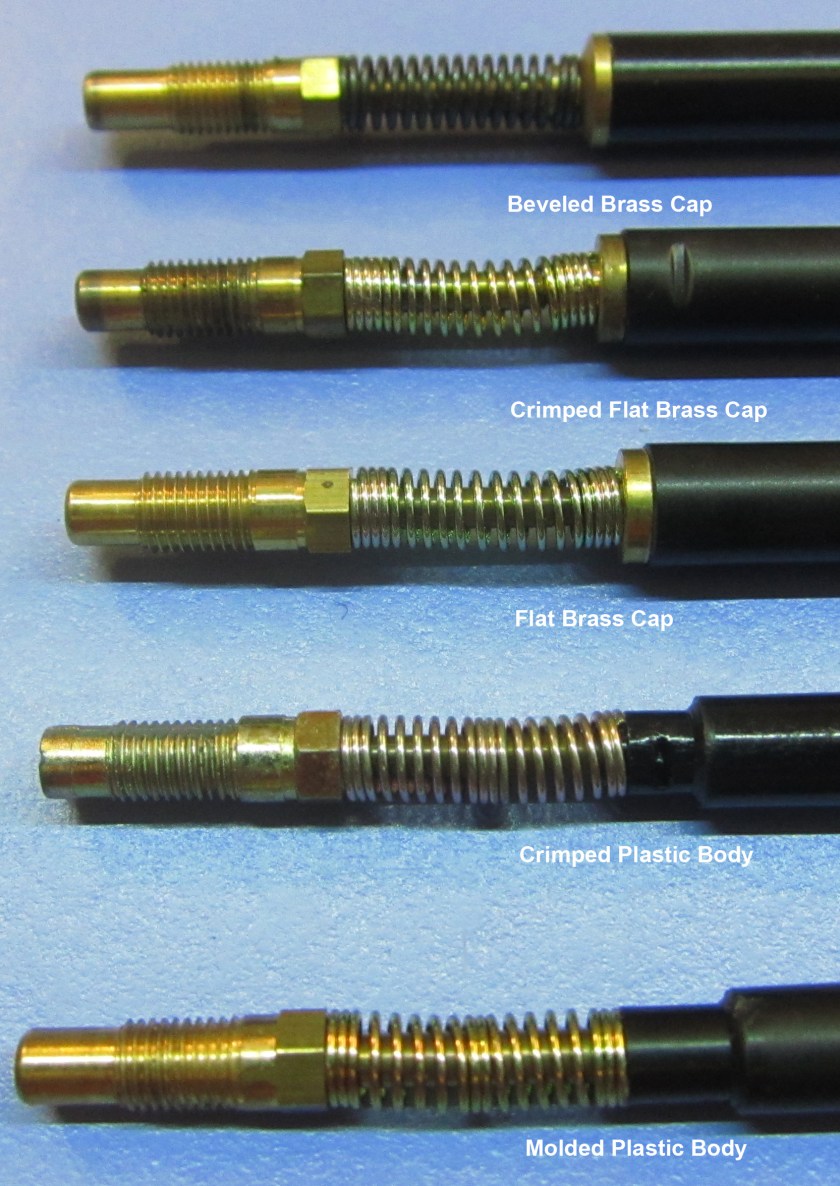
The Inner Body of the has changed incrementally over the lifetime of the P200 family. There have been 5 basic versions, with some minor variations; mostly color of the barrel. There are two areas that define these versions; the point where the spring meets the barrel, and the open end of the barrel.
Inner Body 1 – Beveled Brass Cap
The front of the body where the spring sits is a brass cap that is beveled. The barrel is smooth from the front to the other end where the eraser fits.
Inner Body 2 – Crimped Flat Brass Cap
The front of the body of this version also has a brass cap, but it is flat. Where it joins the barrel, the barrel is crimped. The rest of the barrel is smooth all the way to the back.
Inner Body 3 – Flat Brass Cap
The only major difference between this body and Inner Body 2, is that it is not crimped. Like Inner Body 1, the brass cap is press-fit into the barrel.
Inner Body 4 – Crimped Plastic Body with Molded Cap Stop
This is the first major revision of the Inner Body. The brass cap is no longer used, and the feed tube is crimped into the plastic body. The spring also rests on a narrow body of plastic that then enlarges to the main barrel. This barrel tapers from about 5.15mm to about 6.25mm at a lip that is 12.25mm from the end of the barrel, which is the new Cap Stop. After this lip, the barrel is about 5.85mm tapering down to about 5.65mm, allowing the cap to easily slide on and stop.
Inner Body 5 – Molded Plastic Body with Molded Cap Stop
The only difference between this Inner Body and Inner Body 4 is that the feed tube is now molded into the body, not crimped. Again, the barrel tapers up to a Cap Stop, then a narrower section for the cap to rest in.
[Edited on April 16, 2017 to add note about the 0.9mm Tip with a 2mm Guide]

One thought on “P200 Family Components”